
Summer's #1 Failure Point
How a $40 AC Capacitor Can Save You a $400 Repair Bill
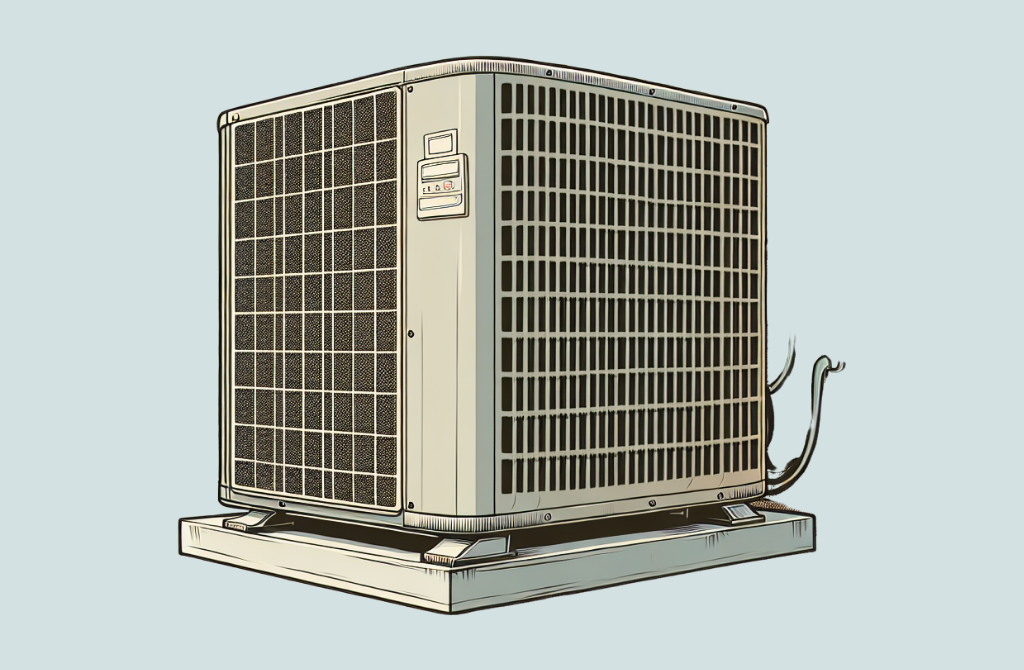
The summer heat has arrived, but your house isn't feeling the cool relief. Instead, you hear a troubling, low hum from your outdoor air conditioning unit. The fan isn't spinning. Your first thought is the inevitable, wallet-draining call to an HVAC professional. The hours of waiting, the unpredictable diagnostic fees, and the final, hefty bill can cast a shadow over any summer day.
But what if the solution wasn't a $400 emergency call, but a sub-$50 part you could replace yourself in under 30 minutes?
For a huge number of summer AC failures, this is the reality. The culprit is a small, inexpensive component called a capacitor. This guide will empower you to diagnose the problem, understand the massive potential savings, and walk you through the fix step-by-step. Before you call a pro, read this. You can be the hero of your home and save hundreds of dollars in the process.
And the best part? If you're worried about finding the exact, correct part for your specific unit, don't be. At OhMyPart, our experts will find it for you, for free.
The Telltale Signs: Is Your AC Capacitor the Culprit?
You don't need to be an HVAC technician to spot the signs of a failed capacitor. By learning to recognize a few key symptoms, you can become a confident self-diagnostician. Here’s what to look and listen for:
- A Humming or Buzzing Motor: The most common sign. You can hear the outdoor condenser unit trying to start, but the fan blades remain still. That hum is the motor straining to begin without the electrical jolt the capacitor is supposed to provide.
- Slow or Intermittent Starts: Your AC system takes an unusually long time to kick on, or it shuts off randomly only to try and restart moments later.
- Running but Not Cooling: The indoor unit might be blowing air, and the outdoor unit might be making noise, but the air coming from your vents isn't cold. This indicates the compressor isn't running properly, a job the capacitor is essential for.
The "Stick Test": A Simple Diagnostic
If the unit is humming but the fan won't start, you can perform a quick diagnostic.
SAFETY WARNING
This involves a spinning blade. Use extreme caution, a long, non-conductive object (like a long wooden stick or dowel), and stay far clear of the unit's moving parts.
- While the unit is trying to run (humming), carefully give the fan blades a gentle push in the direction they are supposed to spin.
- If the fan starts up and continues to spin on its own, you have almost certainly identified a bad capacitor. The push provided the manual start that the capacitor failed to deliver electronically.
Visual Clues
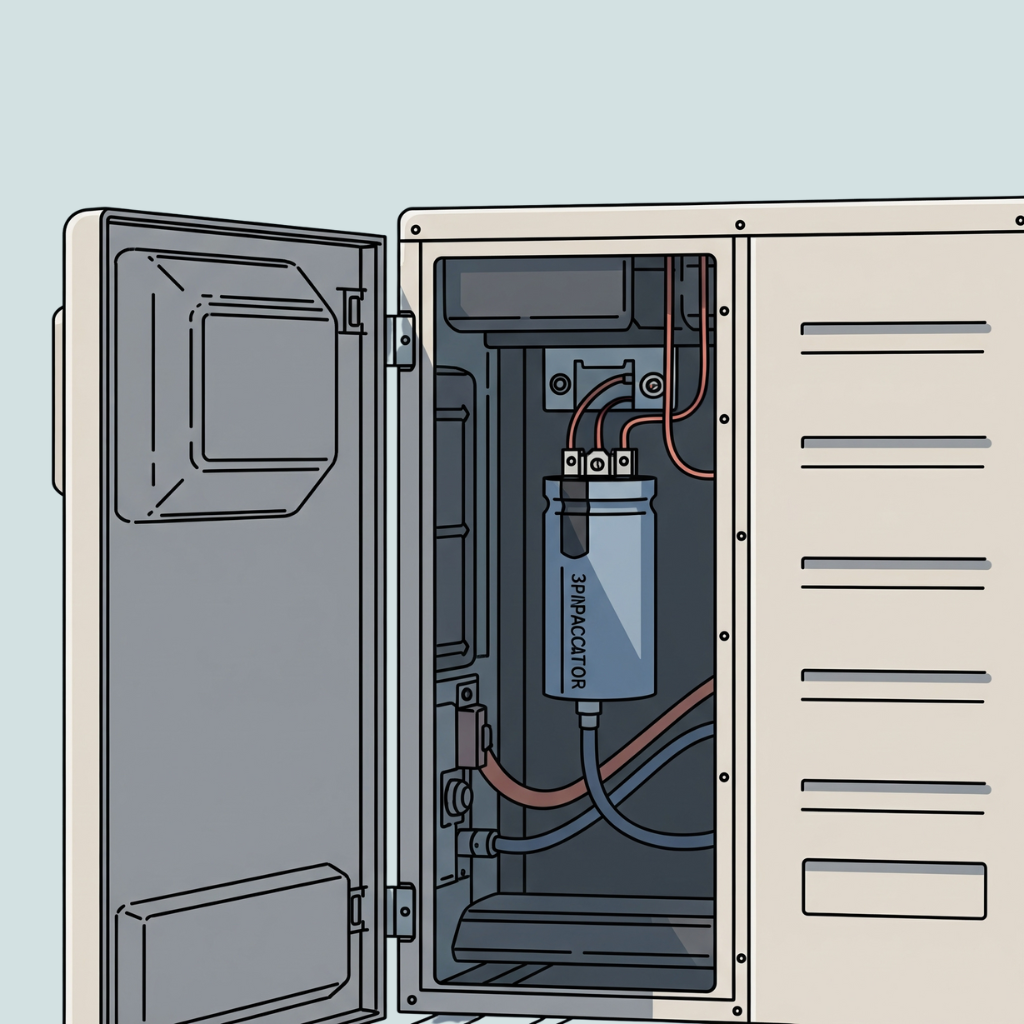 Sometimes, a simple visual inspection is all you need. After turning off all power to the unit (more on this in the guide below), take a look at the capacitor itself:
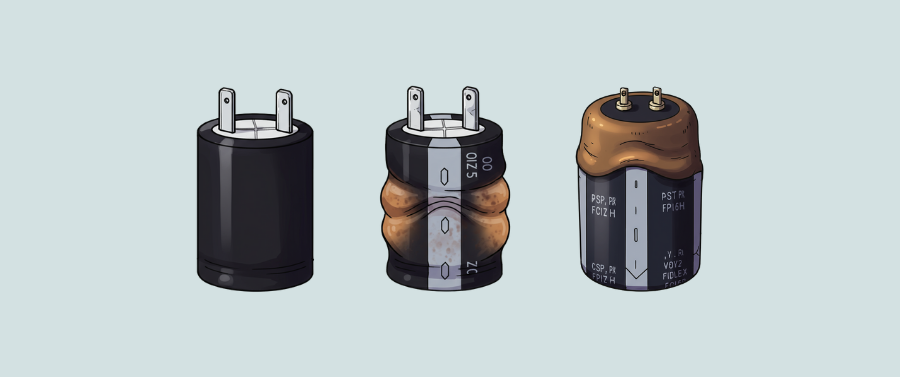
- Bulging or Swollen Casing: The top or bottom of the capacitor should be perfectly flat. Any swelling or bulging is a dead giveaway that it has failed or it will fail very soon with dangerous consequences
- Leaking Fluid: Oily residue on the casing or around the electrical terminals means the capacitor's internal dielectric fluid has leaked, and it needs to be replaced as soon as possible
- Heavy Corrosion or Burn Marks: Significant rust on the terminals can interfere with the electrical connection. Black burn marks indicate arcing, a definitive sign of failure
The Bottom Line: DIY vs. Professional Cost Breakdown
This is where the choice to DIY becomes incredibly clear. The primary reason to tackle this job yourself is the dramatic financial savings. We’re not talking about saving a few dollars; we’re talking about an order of magnitude difference.
A replacement run or dual-run capacitor for a standard residential AC unit typically costs between $15 and $80. Many of the most common models are under $45.
Now, compare that to a professional service call. The average cost for an HVAC technician to diagnose and replace an AC capacitor ranges from $200 to $400, and can even exceed $600 in high-cost-of-living areas or for an after-hours emergency call. The crucial thing to understand is that most of that bill is for labor, trip fees, and overhead—not the part itself. An experienced tech can swap a capacitor in less than 30 minutes with an insulated screwdriver and bare hand.
This table puts the savings into sharp perspective:
| Appliance & Failure | Common Part Needed | OhMyPart.com Est. Part Cost | Average Professional Repair Cost | Potential Savings |
|---|---|---|---|---|
| Air Conditioner (Fan not spinning) | Run/Dual-Run Capacitor | $15 - $80 | $200 - $400 | $120 - $385 |
| Refrigerator (Not cooling) | Evaporator Fan Motor | $30 - $150 | $250 - $400 | $100 - $370 |
| Pool Pump (Humming, not starting) | Start Capacitor | $12 - $30 | $100 - $300 | $88 - $288 |
Choosing the DIY route isn't just spending less money; it's a high-yield investment in "avoided costs." That's a powerful reason to get started. Additionally, once you did the first time, it will be incredibly easier the next time something similar will happen to you or your family and friends.
Finding Your Match: Demystifying Capacitor Specifications
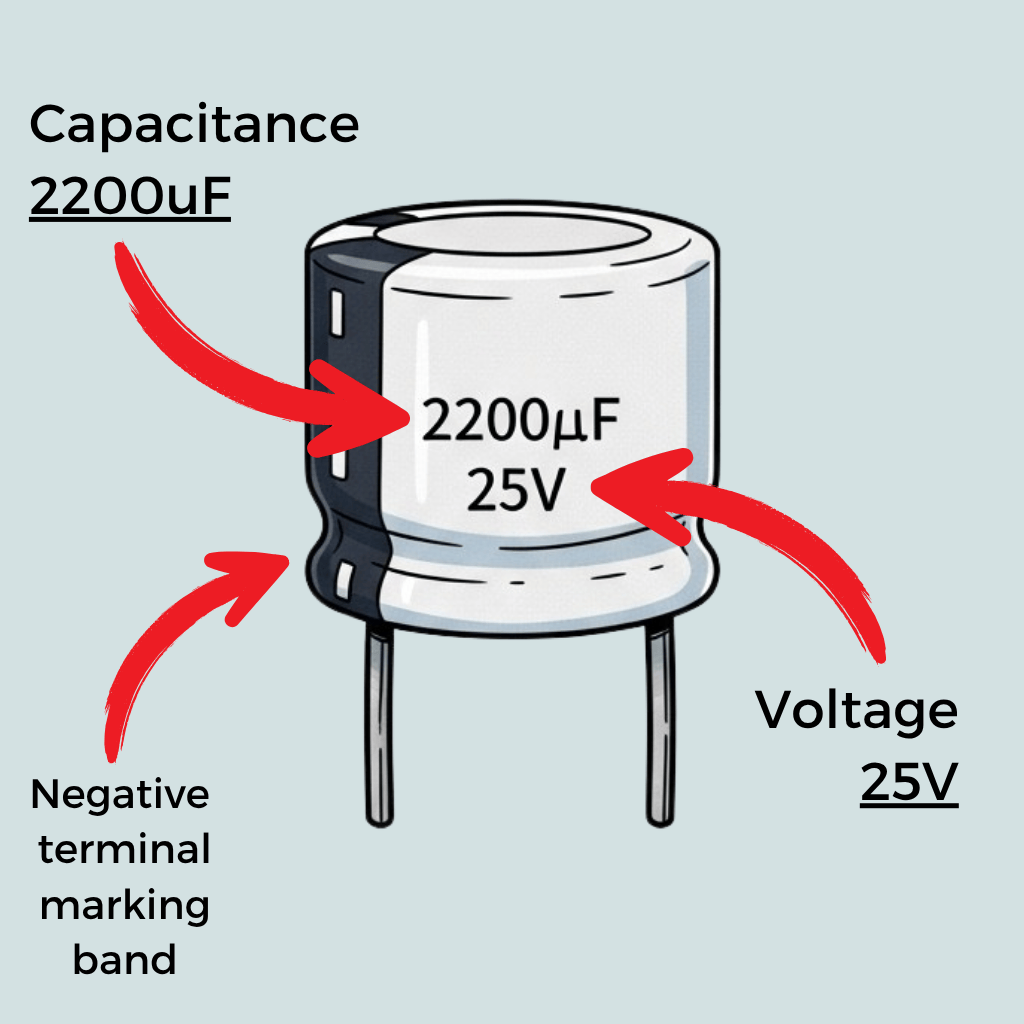
After seeing the potential savings, the biggest hesitation for most people is the fear of ordering the wrong part. We're here to eliminate that fear. All the information you need is printed right on the side of the old capacitor.
Capacitors are definitely not super-duper tech. It has just a couple of relevant values and safe and danger part (more in discharge chapter) to touch without proper insulation.
Here are the key specs you must match:
- Capacitance (µF or MFD): Measured in microfarads, this is the capacitor's ability to store a charge. This value must be an exact match. Using a capacitor with a 35µF rating when you need a 40µF will cause the motor to run inefficiently, overheat, and fail prematurely.
- Voltage (VAC): This indicates the maximum voltage the capacitor can handle. The rule is simple: the replacement's voltage must be equal to or higher than the original. A 440VAC capacitor is a superior replacement for a 370VAC model because it will handle electrical spikes better and last longer. Just never go lower!
- Terminals: A single capacitor has two terminals ("Common" and "Fan" or "Herm"). A dual-run capacitor (very common in AC units) serves two motors and has three terminals: "C" for Common, "FAN" for the fan motor, and "HERM" for the Hermetically sealed compressor. Your replacement must have the correct terminal configuration.
- Shape: Capacitors can be round or oval. Electrically, they are identical. The shape only matters for fitting into the mounting bracket inside your AC unit. Match the shape to make installation easy.
Feeling Overwhelmed? Let Us Handle It.
Identifying the right specs is crucial. If you're unsure, or just want to guarantee you get the right part without the hassle, that's what we're here for.
Snap a photo of your part, tell us what it's from, and our experts will send you a direct link to the exact match you need.
Dual-run Capacitor
The most frequent capacitor, especially in big AC unit, serve two main purpose:
- compressor (high capacitance)
- fun (low capacitance)
Basically it's like 2 capacitors in one, so just like the previous one you will have:
- Voltage (VAC)
- Terminals
- Shape
Refer to the previous chapter for more details about this values.
The main difference is the presence of 3 pins instead of 2 (one for the compressor, one for the fan), each ones with it's own Capacitance (µF or MFD). So if your capacitor has 3 pins, additionally to the previous chapter values you have to check both capacitance are exactly the same as the original faulty one.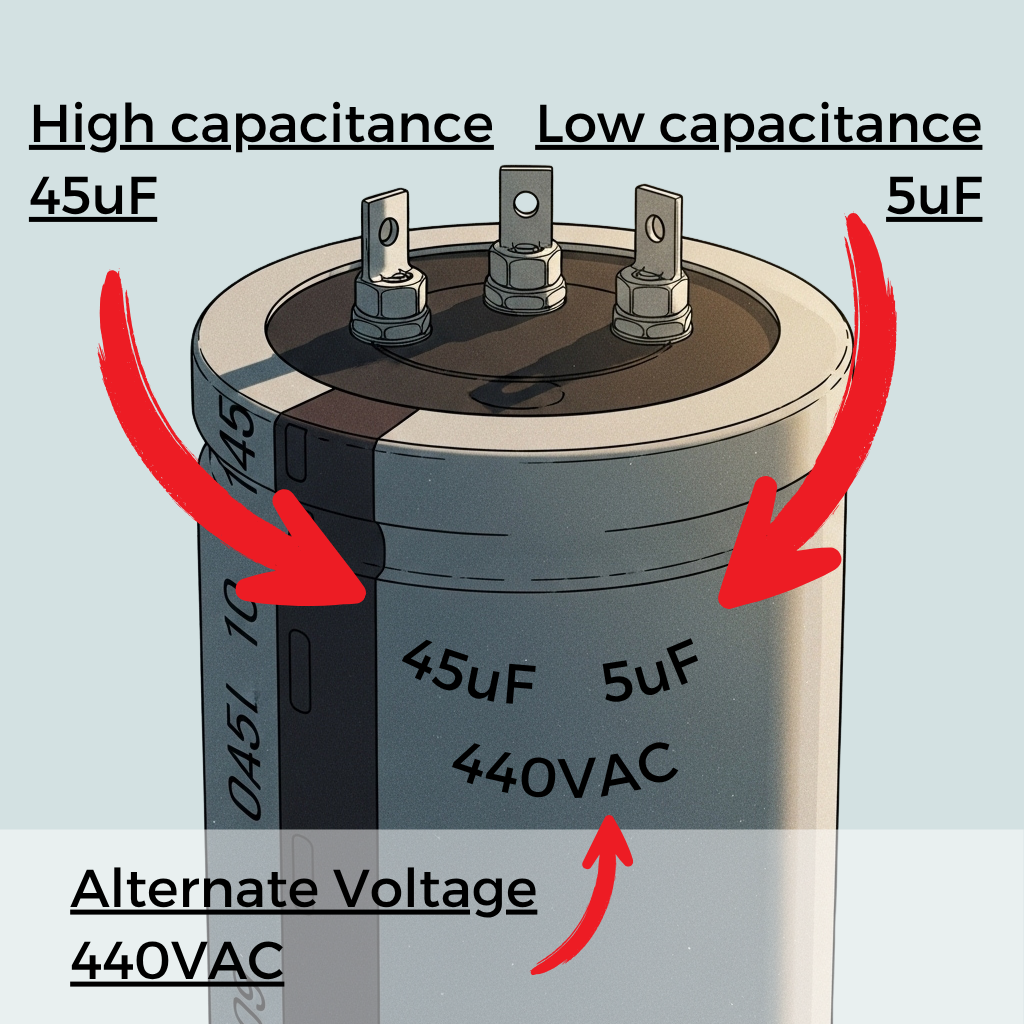 The high capacitance is for the compressor, while the lower one refer to the fan circuit.
The 15-Minute Fix: A Step-by-Step Replacement Guide
You’ve diagnosed the problem and identified the part. Now for the final step: the repair. With a focus on safety, this is a surprisingly quick and simple process.
SAFETY FIRST: Power Down Completely
 This is the most important step. An AC unit runs on high voltage.
- Turn off the breaker in your main electrical panel that powers the outdoor AC unit.
- Pull the disconnect. On the exterior wall near your AC unit, there is a small electrical box. Open it and pull out the disconnect block.
- Use a non-contact voltage tester on the wires coming into the unit to be 100% certain the power is off before you proceed.
⚠️ Discharge the Capacitor
Even with the power off, a capacitor can hold a dangerous electrical charge. You must discharge it. If you don't have proper insulation equipment, never touch more then one contact bar at the time with bare hand.
- Keep capacitor in a hand touching safe zone only
- Keep the screwdriver in other hand touching safe zone only
- Gently touch the first pin in the middle of the screwdriver
- Move the screwdriver until pointer reach the other bar
 You will see a shock proportional to capacitor dimension and remaining charge available at the moment of the short-circuit.
⚠️ High Voltage Capacitors
Greater then 100VAC capacitors are not considered safe to discharge though screwdriver. In this case is a better choice to use a proper capacitor discharge tool. This safety boy cost as low as 15$ to 30$ so it shouldn't ruin your plan. If you don't know which is the proper one to buy just drop a call at the OhMyPart we will provide the best one in a matter of no time. 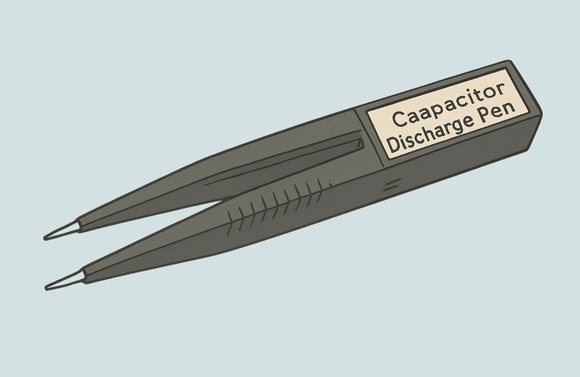
The Repair Process
- Document and Disconnect: Before you remove a single wire, take a clear photo with your smartphone. This picture is your perfect guide for reassembly. You can also use masking tape to label which wire goes to which terminal (C, FAN, HERM). Once documented, use pliers to gently pull the wire connectors off the terminals.
- The Swap: A metal strap holds the capacitor in place. Unscrew it and remove the old capacitor. Slide the new one in and secure it with the same strap.
- Reconnect: Using your photo as a guide, connect the wires to the correct terminals on the new capacitor. Ensure the connectors are snug.
- Test and Finish: Replace the unit's access panel. Re-insert the disconnect block outside and turn the circuit breaker back on. Go inside, set your thermostat to cool, and listen for the sweet sound of your AC starting up smoothly.
You Fixed It. What's Next?
Congratulations! You've just saved yourself hundreds of dollars, avoided a long wait for a technician, and finished a repair that many people are too intimidated to try.
Your time is valuable. OhMyPart exists to eliminate the most frustrating part of any DIY project: the endless, confusing hunt for the right part.
Let us handle the tedious work of scouring suppliers and deciphering part numbers. You focus on what matters—getting your project finished and your life back to normal.
Ready to get started?